
For homeowners in a conservation area, reaching EPC Band C is not about applying a generic eco-checklist. It’s a technical balancing act. The key is a ‘fabric-first’ approach using vapour-permeable materials to avoid damp, and submitting a detailed Heritage Statement to gain planning approval for sensitive upgrades like slimline double glazing. This strategy prioritises preserving the building’s character while surgically improving its performance.
As a homeowner in a London conservation area, you’re likely caught between two powerful forces: the sting of escalating energy bills and the stringent rules designed to protect the historic character of your Victorian terrace. The government’s push towards an EPC rating of ‘C’ or higher feels less like a goal and more like an impossible demand. Standard advice often suggests solutions like external wall insulation or chunky uPVC windows—changes that would be summarily rejected by any planning officer and would permanently damage the architectural integrity you cherish.
The common narrative revolves around a simple checklist of modern technologies: install a heat pump, add solar panels, replace the windows. However, for a solid-walled period property, this approach is not just ineffective; it can be actively harmful. Trapping moisture within solid brick walls with non-breathable insulation can lead to catastrophic interstitial condensation and mould, while an improperly specified heat pump will struggle to heat a draughty home, leading to exorbitant running costs. The challenge isn’t just about efficiency; it’s about compatibility with the building’s original fabric.
But what if the path to EPC Band C wasn’t about bolting on new technology, but about a surgical, sympathetic enhancement of the building’s existing structure? This guide moves beyond the platitudes. It adopts the perspective of a conservation-focused chartered surveyor, prioritising a fabric-first approach that respects the unique physics of a Victorian home. We will focus on understanding vapour permeability, navigating the complexities of planning law, and making informed choices about insulation and heating that work *with* your home, not against it.
This article will guide you through the technical realities and strategic decisions required to achieve modern comfort and efficiency while honouring the heritage of your property. We will explore the precise reasons councils reject upgrades, how to insulate correctly, and what heating systems are genuinely viable, providing a clear roadmap to a warmer, more sustainable, and fully compliant home.
Summary: A Surveyor’s Roadmap to a C-Rated Victorian Terrace
- Why Local Councils Reject 40% of Double Glazing Applications in Conservation Areas?
- How to Insulate Solid Brick Walls from the Inside Without Creating Mould Risks?
- Heat Pumps vs High-Efficiency Boilers: What Works Best for Draughty Period Homes?
- The Asbestos Hiding Spots in Pre-2000 Renovations That Most Buyers Miss
- Calculating the Real Cost of Rewiring a 3-Bedroom Victorian House in 2024
- Rebuild Cost Assessment: Why Your Mortgage Valuation Is Irrelevant for Insurance?
- Z-Wave vs Wi-Fi: Which Protocol Penetrates Victorian Brick Walls Best?
- Replacing Windows in a Conservation Area: What Will the Council Approve?
Why Local Councils Reject 40% of Double Glazing Applications in Conservation Areas?
The high rejection rate for window applications in conservation areas is rarely about a blanket opposition to double glazing. Instead, it stems from a failure to respect the subtle but critical visual grammar of a historic façade. A planning officer’s primary duty is to preserve the area’s character, and modern, off-the-shelf windows often fail this test in several key ways. The most common pitfall is the use of materials like uPVC or aluminium with a high-gloss finish, which starkly contrasts with the traditional low-sheen, painted timber of Victorian sashes.
Beyond material, the dimensions and details are paramount. Standard double-glazed units have a noticeable thickness and wider air gaps between the panes, creating a deeper, bulkier profile. This results in thicker frames and glazing bars that disrupt the delicate proportions of the original design. As detailed in conservation area window replacement guidelines, even the reflection from the glass can be a point of contention; the flat, uniform reflection of a modern unit looks jarringly different from the slight distortions of historic crown or cylinder glass. The officer is looking for a proposal that mimics the original sightlines, frame depths, and putty lines as closely as possible.
Ultimately, a rejection is often a sign that the application has prioritised thermal performance at the expense of aesthetic authenticity. The council is not asking homeowners to freeze in single-glazed properties, but it is demanding a more considered, sensitive approach. A successful application demonstrates a deep understanding of what makes a Victorian window look ‘right’ and proposes a solution that achieves modern standards through minimum intervention, rather than wholesale replacement with an incongruous modern product. This is why generic proposals fail, while meticulously detailed ones that specify appropriate materials and dimensions stand a much higher chance of approval.
How to Insulate Solid Brick Walls from the Inside Without Creating Mould Risks?
Insulating the solid brick walls of a Victorian terrace is one of the most effective ways to improve its EPC rating, but it is also one of the most hazardous if done incorrectly. Unlike modern cavity walls, a solid wall ‘breathes’—it manages moisture by allowing water vapour to pass through its structure and evaporate away. Covering it internally with non-breathable insulation, such as standard PIR (polyisocyanurate) foam boards with a foil backing, traps this moisture. This creates interstitial condensation, where vapour turns to water inside the wall structure, leading to damp, mould, and even the decay of timber elements like floor joists embedded in the wall.
The solution is to use insulation materials that are vapour-permeable or ‘breathable’. These materials work in harmony with the wall’s natural hygroscopic properties, allowing moisture to travel through them without getting trapped. Options like wood fibre, cork, and calcium silicate boards are specifically designed for this purpose. They provide thermal resistance while maintaining the wall’s ability to breathe, thus preventing the build-up of moisture that causes mould. The choice of material often depends on a balance between thermal performance (Lambda value), cost, and specific site conditions.
Given the technical risks, this is not a DIY job. The process should be managed under the UK’s official framework for domestic retrofits, PAS 2035. As the National Energy Foundation clarifies in their guidance, this process is overseen by a qualified professional. In their guide to PAS 2035, they state:
The Retrofit Coordinator will draw up the improvement plan (which will span a period of 25 years) based on the information provided by the Retrofit Assessor and ensure that all elements of the retrofit are properly managed and coordinated.
– National Energy Foundation, PAS 2035 and PAS 2030: retrofit, accreditation and certification guide
This professional assesses the property as a whole, models the hygrothermal (heat and moisture) risk, and specifies a compatible system of breathable insulation and appropriate vapour control layers. This structured approach is the only way to ensure the long-term health of the building fabric while achieving significant energy savings.
The following table provides a comparison of common breathable insulation materials available in the UK, helping you understand the options a Retrofit Coordinator might consider.
| Material | Lambda (W/m·K) | Breathability | Cost (£/m²) | Best Use Case |
|---|---|---|---|---|
| Wood Fibre Boards | 0.037–0.045 | Excellent | £45-70 | Where thickness available, summer overheating control |
| Cork Boards | 0.037–0.040 | Excellent | £50-80 | Naturally rot/mould resistant, heritage buildings |
| Calcium Silicate | 0.065-0.070 | Good | £60-90 | Where moisture is a problem, basements |
| Sheep’s Wool | 0.038-0.040 | Excellent | £25-40 | Loft spaces, between timber studwork |
| Hemp-Lime | 0.038–0.045 | Excellent | £70-100 | Cast-in-situ applications, bulk insulation |
Heat Pumps vs High-Efficiency Boilers: What Works Best for Draughty Period Homes?
The push towards heat pumps as the default green heating solution often overlooks the specific context of a draughty, poorly insulated Victorian home. A heat pump works most efficiently when producing water at a low flow temperature (around 35-45°C), which is ideal for a highly insulated modern home with underfloor heating or oversized radiators. In a period property with significant heat loss through its solid walls, uninsulated floors, and sash windows, a heat pump must work much harder, often at higher, less efficient flow temperatures, to maintain a comfortable environment. This can lead to disappointingly high running costs that negate the environmental benefits.
This is where the ‘fabric-first’ approach becomes non-negotiable. Before even considering a heating system upgrade, the priority must be to reduce the building’s heat demand by improving its thermal envelope. This means comprehensive draught-proofing, loft and floor insulation, and addressing the solid walls and windows as discussed in other sections. Only when the building’s fabric is performing as well as it can should the heat source be evaluated. Rushing to install a heat pump in an unimproved Victorian house is like trying to fill a leaky bucket—a fundamentally inefficient exercise.
For many Victorian homeowners, particularly those facing budget or planning constraints that limit fabric improvements, a modern high-efficiency condensing boiler remains a highly pragmatic choice. While it still relies on fossil fuels, a new A-rated boiler can be over 90% efficient, a significant improvement on older models. It operates effectively at the high flow temperatures required to heat a period property using its existing radiators, providing reliable comfort without the need for a complete (and expensive) radiator system overhaul. In some retrofits, a hybrid system—combining a smaller heat pump for baseline heating with a boiler for peak winter demand—can offer a compromise, but for many, optimising the fabric and installing a high-efficiency boiler is the most sensible and cost-effective step towards EPC C.
The Asbestos Hiding Spots in Pre-2000 Renovations That Most Buyers Miss
While Victorian terraces themselves were built long before the widespread use of asbestos, many underwent significant modernisation between the 1950s and the late 1990s—the peak era for asbestos-containing materials (ACMs). As a chartered surveyor, I find that homeowners are often completely unaware of these hidden dangers until they plan renovation work. Disturbing these materials without proper precautions can release harmful fibres into the air, posing a serious health risk.
It is crucial to be aware of the common hiding spots for asbestos from these later renovations. Some of the most frequently missed locations include:
- Textured Coatings (Artex): Many ceilings and some walls were covered with textured coatings before 2000, and these often contained a small percentage of chrysotile (white) asbestos to strengthen them.
- Vinyl Floor Tiles: 9-inch and 12-inch vinyl floor tiles, particularly those from the 60s and 70s, often contained asbestos. The black bituminous adhesive used to stick them down can also be an ACM.
- Cement Water Tanks and Flues: Cold water storage tanks in lofts and cement flue pipes for boilers or fireplaces were commonly made from asbestos cement.
- Insulation Boards: Asbestos Insulating Board (AIB) was used extensively for fire protection panels in fuse boxes, behind fireplaces, as ceiling tiles, and in airing cupboards. This is one of the more dangerous forms.
- Pipe Lagging: The insulation wrapped around old heating pipes is a classic location for fibrous asbestos, which is highly friable and dangerous.
Before any intrusive work begins as part of an EPC upgrade—such as rewiring, replumbing, or knocking through walls—it is essential to commission an Asbestos Refurbishment/Demolition Survey. This is a legal requirement under the Control of Asbestos Regulations 2012 for any non-domestic property, and best practice for all. A surveyor will take samples of suspect materials for laboratory analysis. If asbestos is found, any work affecting it must be carried out by a licensed specialist. Ignoring this step not only endangers your family and tradespeople but can also lead to huge, unexpected costs and project delays.
Calculating the Real Cost of Rewiring a 3-Bedroom Victorian House in 2024
Rewiring is an “invisible” upgrade that doesn’t obviously boost an EPC rating but is a fundamental aspect of making a Victorian house safe and fit for the 21st century. The cost is often underestimated by homeowners because it goes far beyond the price of cable and sockets. For a typical 3-bedroom Victorian terrace in London or the South East, a full rewire in 2024 is a significant investment, and the final bill is composed of several distinct elements.
The primary cost is labour. A full rewire is an invasive job that typically takes two qualified electricians 5 to 10 working days. With day rates in the region of £250-£350 per electrician, the labour cost alone can quickly amount to £2,500-£7,000. This involves lifting floorboards, chasing channels into solid brick and plaster walls, and running new cabling to every light fitting, switch, and socket outlet throughout the house. The job is inherently more complex in a period property due to the solid wall construction and the need to work carefully around original features.
Next are the materials. This includes a new modern consumer unit (fuse box) with RCD/RCBO protection (£200-£500), hundreds of metres of copper cabling, and the fixtures themselves—sockets, switches, light pendants, and downlights. The quality and style of these fittings can cause the material cost to vary significantly, from a basic £1,000 to several thousand for high-end, period-appropriate brass or ceramic fittings. Finally, homeowners must budget for the ‘hidden’ cost of making good. Chasing walls creates a huge amount of dust and leaves channels that need to be re-plastered and redecorated. This can easily add another £1,500-£3,000+ to the project, a cost often excluded from the electrician’s initial quote. In total, a homeowner should budget for a realistic range of £6,000 to £12,000+ for a full rewire of a 3-bedroom Victorian terrace in 2024.
Rebuild Cost Assessment: Why Your Mortgage Valuation Is Irrelevant for Insurance?
A common and potentially ruinous mistake made by owners of Victorian properties is confusing their home’s market value with its rebuild cost for insurance purposes. The ‘Valuation for Mortgage Purposes’ you received when buying your house is an assessment of its market value—what someone is willing to pay for the building, the land it sits on, and its location. This figure is heavily influenced by market trends, school catchments, and transport links. It has almost no bearing on the actual cost of rebuilding the house from the ground up in the event of a catastrophic event like a fire.
The Rebuild Cost Assessment (RCA), which is what your buildings insurance policy should be based on, is a completely different calculation. It estimates the total cost of demolishing any remaining structure, clearing the site, paying professional fees (architects, surveyors), and reconstructing the property to the exact same size and specification using materials and craftsmanship of a similar kind and quality. For a Victorian terrace, this is often significantly higher than for a modern home. The RCA must account for specialist materials like reclaimed London stock bricks, Welsh slate for the roof, timber sash windows, and intricate plaster cornices.
Furthermore, it must factor in the use of specialist tradespeople skilled in traditional building techniques. Under-insuring your property based on its market value could leave you with a devastating shortfall. If your rebuild cost is £700,000 but you are only insured for a market value of £500,000, the insurer may apply the ‘Condition of Average’, meaning they would only pay out a proportion of any claim, even a small one. For owners of period properties, especially in high-value areas like London, it is essential to obtain a professional RCA from a chartered surveyor (many services are available online via the RICS) and not rely on the market valuation or generic online calculators. This ensures you are fully protected and your policy is valid.
Z-Wave vs Wi-Fi: Which Protocol Penetrates Victorian Brick Walls Best?
As homeowners look to integrate smart technology for energy management—such as smart thermostats, radiator valves, and lighting—they often encounter a fundamental problem in Victorian houses: poor signal reliability. The culprit is typically the very thing that makes these homes so robust: their solid brick walls. Standard Wi-Fi, which operates on high-frequency 2.4GHz and 5GHz bands, struggles to penetrate these dense, thick barriers. This results in dead spots, dropped connections, and frustratingly unresponsive smart devices, particularly on different floors or at the rear of the property.
This is where understanding the underlying technology becomes crucial. Z-Wave is a wireless communication protocol designed specifically for smart home automation, and it has two key advantages in a period property. Firstly, it operates on a much lower frequency in the UK (868.42 MHz). Lower-frequency radio waves have longer wavelengths, which are significantly better at penetrating physical obstacles like solid brick and plaster walls compared to the short wavelengths of Wi-Fi. A single Z-Wave hub can therefore communicate reliably with devices over a much greater range within a Victorian home.
Secondly, Z-Wave uses a mesh network topology. In this setup, every mains-powered Z-Wave device (like a smart plug or light switch) acts as a repeater, receiving and re-transmitting the signal to other devices. This creates a resilient, self-healing network. If the signal from the hub can’t reach a smart radiator valve in a back bedroom directly, it can ‘hop’ through a smart plug in the hallway, for example. Wi-Fi, by contrast, typically uses a ‘star’ topology where every device must connect directly to the central router. For anyone serious about creating a reliable smart home in a Victorian terrace to help manage energy and improve their EPC, choosing a Z-Wave-based system over a collection of disparate Wi-Fi devices is the technically superior strategy for robust, whole-house coverage.
Key Takeaways
- A ‘fabric-first’ approach is essential: improve the building’s insulation and airtightness before upgrading heating systems.
- Use only vapour-permeable (‘breathable’) insulation on solid walls to prevent catastrophic damp and mould issues.
- Gaining planning permission in a conservation area requires a detailed Heritage Statement justifying why your chosen upgrades are the minimum necessary intervention.
- A high-efficiency condensing boiler is often a more pragmatic and effective choice than a heat pump in an unimproved, draughty Victorian home.
Replacing Windows in a Conservation Area: What Will the Council Approve?
Faced with a rejection notice or the daunting prospect of a planning application, homeowners often feel that their only option is to retain inefficient single-glazed windows. However, councils will approve well-conceived proposals that demonstrate a commitment to preserving the building’s character. The key is to move away from standard modern products and towards specialist solutions designed for heritage properties.
There are generally three routes that find favour with planning officers:
- Full Refurbishment and Draught-Proofing: The most conservation-friendly approach. This involves carefully removing the original sash windows, repairing any rotten timber, servicing the weights and pulleys, and installing high-performance draught-proofing strips into the frames and meeting rails. While it doesn’t improve the U-value of the glass itself, it dramatically reduces heat loss from air leakage and is the most likely to be approved without issue.
- Slimline Double Glazing: This is the most sought-after solution. Specialist companies manufacture new timber sash windows that look almost identical to the originals but contain very thin double-glazed units. These units have a small cavity (typically 12-14mm) filled with an inert gas like Krypton or Xenon, allowing them to fit into much finer frames that replicate historic profiles. This offers a significant thermal improvement while being visually acceptable to most conservation officers.
- Secondary Glazing: A less invasive and more affordable option. This involves fitting a discreet, separate pane of glass in a slim frame (often aluminium) to the inside of the existing window. While some find it less aesthetically pleasing, modern secondary glazing is very effective at reducing both heat loss and noise, and as it doesn’t alter the external appearance of the building, it often does not require planning permission (though it’s always wise to check).
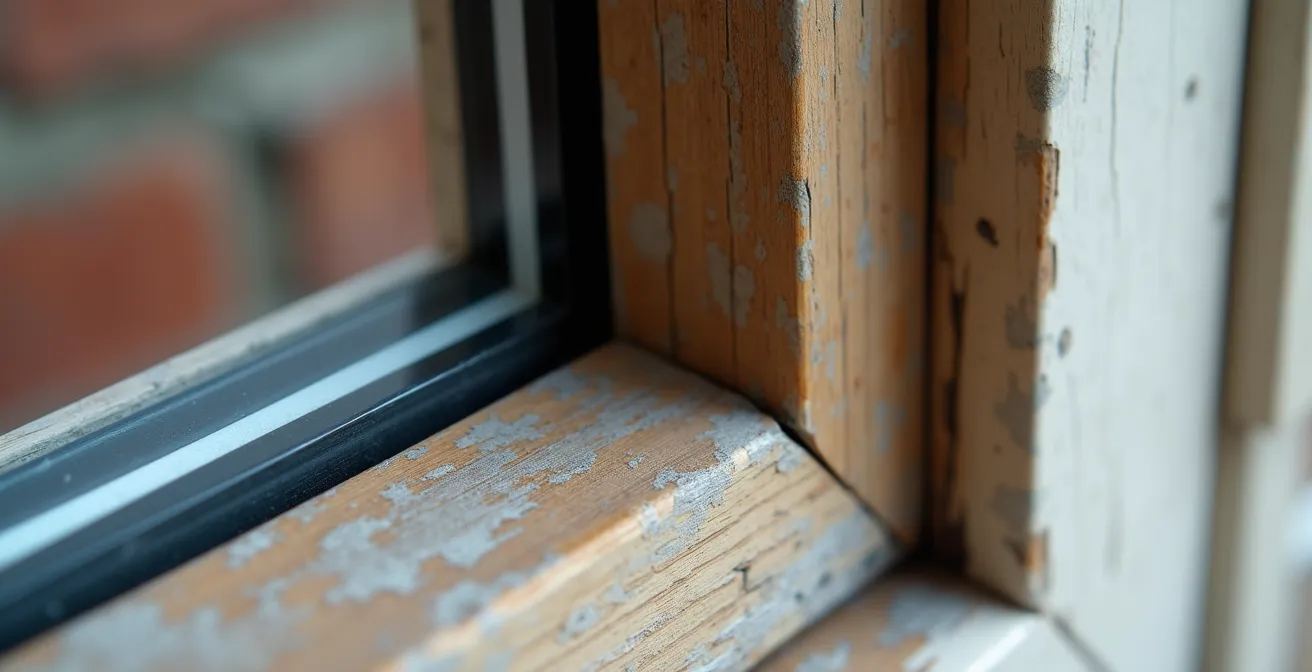
As the detail shot above illustrates, the success of slimline glazing lies in its ability to mimic the delicate appearance of a single-glazed sash. To secure approval for such a replacement, a robust application is essential. You cannot simply submit a brochure; you must build a case.
Action Plan: Assembling Your Heritage Statement for Window Replacement
- Photographic Evidence: Commission professional photographs showing the current poor state of the windows. Include close-ups of timber decay, failing putty, and evidence of condensation to build a case for the necessity of replacement over simple repair.
- Architectural Justification: Provide detailed cross-section drawings that compare your proposed slimline units (specifying the 12-14mm cavity) against the original single-glazed profile. Show how the sightlines and frame dimensions are being respected.
- Minimum Intervention Principle: Explicitly state in your document how your proposal represents the minimum intervention required to achieve necessary thermal and security upgrades, thereby preserving the maximum amount of original fabric or character.
- Precedent Research: Use your local council’s online planning portal to find examples of approved window replacements on similar Victorian properties in your conservation area. Reference these approved application numbers in your statement.
- Detailed Specifications: As advised in comprehensive planning guidance, include exhaustive details on the proposed timber, the paint finish (specifying a low-sheen, traditional colour), and the glazing style to leave no room for ambiguity.
To successfully navigate the complexities of retrofitting your Victorian home, the next logical step is to commission a detailed assessment from a chartered surveyor or a certified Retrofit Coordinator who can create a bespoke, whole-house plan that respects both heritage and modern energy standards.