The most valuable loft conversion isn’t necessarily the largest; it’s the one that best resolves your home’s spatial flow and your family’s specific needs.
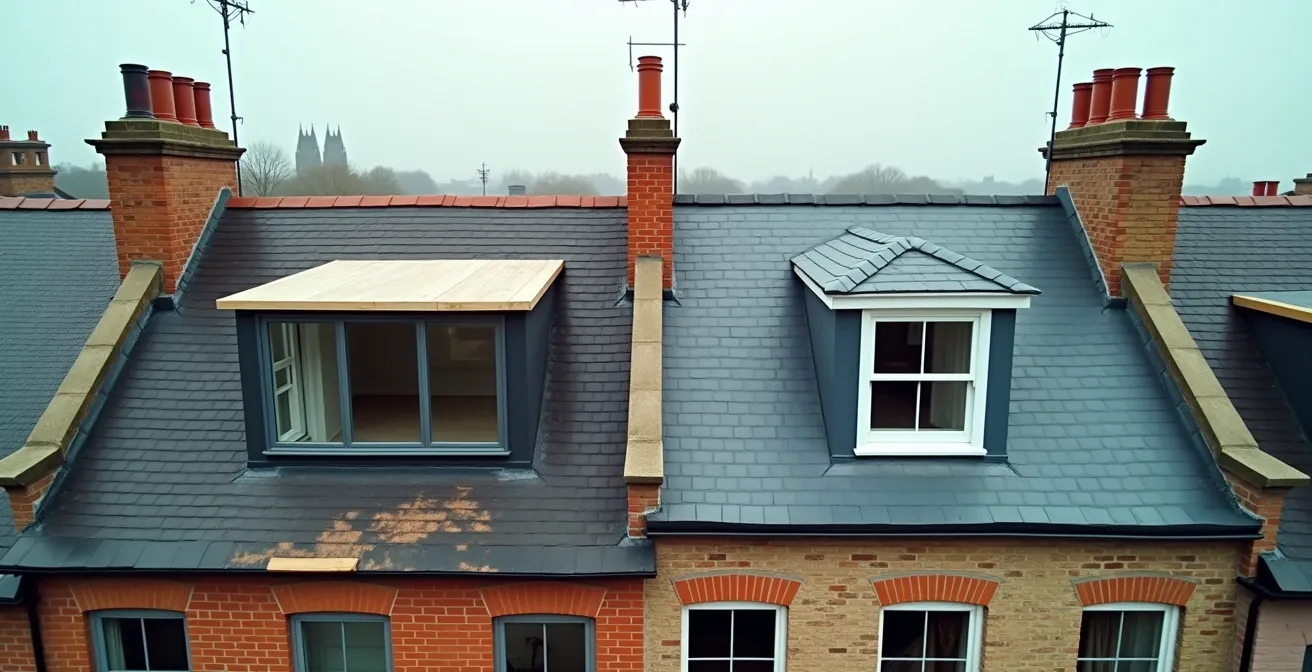
- An L-shaped dormer offers maximum floor area, ideal for adding multiple rooms, but its structural complexity and impact on the existing property require careful architectural planning.
- A rear dormer is a more cost-effective and structurally straightforward solution, perfect for creating a single, high-quality master suite without fundamentally altering the building’s form.
Recommendation: Before focusing on square metres, audit your home’s structural logic and your family’s daily patterns. The right design is an integrated solution, not just an addition.
For a growing family in a London terrace, the walls inevitably start to feel like they’re closing in. The question is no longer *if* you need more space, but *how* to create it. The default answer is often to look up, towards the untapped potential of the loft. This quickly leads to the central debate: the expansive L-shaped dormer versus the classic rear dormer. The common wisdom simply pits size against cost, suggesting the biggest option always adds the most value.
But this is a dangerously simplistic view. As an architect specialising in urban extensions, I’ve seen homeowners fixate on maximising the floor plan, only to end up with a space that feels disconnected, compromises the floor below, or incurs unforeseen costs that erode the final value. The discussion around loft conversions is often cluttered with general advice about planning permission or basic cost estimates, missing the fundamental point.
The true value of an extension lies not in raw square footage, but in its architectural integration and its ability to provide a tailored solution to a specific problem. Is the goal a self-contained master suite, or is it two smaller children’s bedrooms and a shared bathroom? The answer dictates a different spatial and structural logic. The most successful projects are those that enhance the home’s overall spatial flow, turning a simple addition into a seamless and transformative new floor.
This guide moves beyond the surface-level debate. We will explore the critical technical, legal, and design considerations that truly determine the success and value of your project. By understanding these underlying factors, you can make an informed decision rooted in architectural principles, ensuring your investment enhances not just your property’s price tag, but the quality of your family’s life within it.
Summary: L-Shaped vs. Rear Dormer: An Architect’s Guide to Value
- Fire Doors and Escape Routes: What Is Required for a Third-Floor Conversion?
- The Party Wall Notice: When Must You Serve It to Neighbours Before Steelwork?
- Hip-to-Gable: How to Convert a 1930s Semi with a Low Ridge Height?
- Macerators vs Soil Pipes: How to Add a Toilet Without Major External Pipework?
- Overheating Risks: Why You Need External Blinds on South-Facing Dormers?
- Mill Conversions: The Challenges of Turning Factories into Art Spaces?
- Calculating the Real Cost of Rewiring a 3-Bedroom Victorian House in 2024
- Do You Need Planning Permission for a Garden Office with a Toilet?
Fire Doors and Escape Routes: What Is Required for a Third-Floor Conversion?
When you convert a loft, you are not just adding a room; you are creating a third storey. This fundamentally changes the fire safety strategy for your entire home. The primary consideration is ensuring a protected escape route from the new top floor all the way to the final exit door. This means the staircase, landings, and hallways that form this path must be able to resist fire for a set period, typically 30 minutes, allowing occupants to escape safely.
This is usually achieved by upgrading existing doors to FD30 (30-minute fire-rated) doors and ensuring the walls and ceilings enclosing the stairway are sufficiently fire-resistant. This can have a significant impact on the character of a period home, as original Victorian or Edwardian doors may need to be replaced. However, there are modern alternatives that can satisfy Building Regulations while preserving aesthetics. For example, some London councils now accept the use of integrated mist suppression systems.
These systems deploy a fine water mist upon detecting a fire, controlling its spread and temperature without the drenching effect of traditional sprinklers. While they come at a cost, a residential mist system can be a smart investment. According to recent London loft conversion data, a residential mist system costs between £3,000-£5,000, which can often be offset by the savings from not having to replace multiple period doors. This approach prioritises both safety and the architectural integrity of the home, adding true long-term value.
Your Fire Safety Audit for a Three-Storey Home
- Assess Escape Route: Trace the path from the loft stairs to your front door. Identify every door that opens onto this route.
- Door Inventory: Check if existing doors are fire-rated (look for a circular plug or label on the top edge). List those needing replacement with FD30-rated doors.
- Stair Enclosure: Verify that the walls and ceilings of the stairway are constructed from fire-resistant materials (e.g., plasterboard).
- Alternative Solutions: Investigate the feasibility and cost of a mist suppression system as an alternative to replacing all doors.
- Alarm System Plan: Confirm that your plan includes interlinked smoke and heat alarms on every level of the property.
Ultimately, a loft room is only a valuable asset if it is a legally compliant and safe habitable space. Neglecting fire safety is not an option and will be rigorously checked by Building Control.
The Party Wall Notice: When Must You Serve It to Neighbours Before Steelwork?
The Party Wall etc. Act 1996 is a piece of legislation that is almost guaranteed to apply to any loft conversion on a terraced or semi-detached house in London. You must serve a formal notice to your neighbours if your work involves cutting into the shared party wall to insert load-bearing steel beams—a standard procedure for both rear and L-shaped dormers. The critical rule is that you must serve this notice at least two months before the planned start date of the relevant works.
Failure to do so can lead to expensive delays and legal disputes. Your neighbour has 14 days to consent in writing. If they consent, work can proceed. If they dissent or do not respond, you enter a dispute resolution process, which requires the appointment of surveyors. You can either both agree on a single “Agreed Surveyor” or each appoint your own. These surveyors will then draw up a “Party Wall Award,” a legal document that outlines how the work should be carried out to protect all parties.

The structural complexity of the project directly influences the Party Wall process. An L-shaped dormer, for instance, often requires more extensive steelwork that may need to be inserted deeper into the party wall, making the process more sensitive.
Case Study: L-Shaped Dormer Party Wall Complexity in London
An L-shaped conversion on a Victorian terrace extends over both the main roof and the rear “outrigger” extension. This two-part structure often necessitates deeper steel beam insertions to support the new floor joists, triggering Section 6 of the Party Wall Act concerning excavation near a neighbour’s foundation. This increased complexity can make neighbours more likely to dissent, heightening the importance of early communication and professional surveyor involvement.
Navigating this process smoothly is key to maintaining a good relationship with your neighbours and keeping your project on schedule and budget. The costs can vary significantly depending on the path you take.
| Option | Cost Range | Timeline | Best For |
|---|---|---|---|
| Agreed Surveyor | £700-£1,500 | 2-3 weeks | Amicable neighbors |
| Two Surveyors | £1,500-£3,000 | 3-4 weeks | Complex disputes |
| Third Surveyor (if needed) | +£500-£1,000 | +1-2 weeks | Deadlock situations |
From an architect’s perspective, the Party Wall Act is not a barrier but a framework for responsible urban development. Engaging with it proactively demonstrates respect for your neighbours and de-risks your project from the outset.
Hip-to-Gable: How to Convert a 1930s Semi with a Low Ridge Height?
Many 1930s semi-detached or detached houses feature a “hipped” roof, where the roof slopes down to the eaves on all sides. This design significantly restricts the internal head height, often making a standard loft conversion unfeasible. The architectural solution is a hip-to-gable conversion. This involves replacing the sloping “hip” end of the roof with a vertical gable wall, extending the ridge line and creating a full-height space internally.
This is a major structural alteration that falls outside of Permitted Development rights, meaning it will always require a full planning application. The main challenge is designing a gable that is in keeping with the character of the existing house and the surrounding street scene. Planners will scrutinise the materials, brick bonding, and window proportions to ensure the extension doesn’t look like an awkward addition. In sensitive locations like conservation areas, this can be particularly challenging. Research shows that approximately 65% of planning applications in London’s conservation areas face initial objections, highlighting the need for a well-considered design.
Once the gable is built, the newly created volume can then be fitted with a rear dormer to maximise the usable floor space. This combination is a powerful way to unlock the potential of properties with restrictive roof geometry, often creating enough space for a large master bedroom and en-suite. The cost is higher than a simple dormer due to the significant structural work, but the value gained in terms of high-quality, usable space can be immense.
Most builds sit between £30,000 and £60,000, depending on the design and finishes you go for.
– Paramount Built Construction, UK Dormer Conversion Guide 2025
This type of conversion is a prime example of how a significant architectural intervention, though more complex and costly, can be the only way to create truly valuable and functional living space in an otherwise compromised roof volume.
Macerators vs Soil Pipes: How to Add a Toilet Without Major External Pipework?
Adding a bathroom is a primary driver for many loft conversions, but the plumbing can be a major hurdle. The challenge is connecting the new toilet to your home’s main soil stack. The traditional method involves installing a 110mm diameter soil pipe, which relies on gravity. In a loft, this can be architecturally disruptive, requiring either a large internal boxing-in that eats into valuable space or unsightly external pipework running down the rear of your property—something often forbidden in conservation areas.
The modern alternative is a macerator pump. This is a unit, often located behind the toilet, that uses blades to grind waste and toilet paper into a slurry, which is then pumped away through a small-bore pipe (as small as 22mm). This small pipe can be easily concealed within walls or floor joists and can pump waste horizontally or even vertically, offering immense design flexibility. It allows you to place a bathroom almost anywhere in the loft without being constrained by the location of the main soil stack.
However, this flexibility comes with trade-offs. Macerators require electricity to run, add a low level of background noise when in operation, and have a finite lifespan with ongoing maintenance requirements. They are a mechanical solution to a gravity problem. From a value perspective, some homebuyers can be wary of them. The decision involves weighing the upfront installation benefits against the long-term running costs and potential impact on resale value.
This comparative table breaks down the key decision-making factors when choosing a drainage solution for your new loft bathroom.
| Factor | Macerator | Traditional Soil Pipe |
|---|---|---|
| Installation Cost | £500-£1,500 | £2,000-£4,000 |
| Running Cost (annual) | £50-£100 electricity | £0 |
| Lifespan | 10-15 years | 50+ years |
| Maintenance | Annual service £150 | Minimal |
| Conservation Area Suitable | Yes | Often rejected |
| Resale Impact | May deter 20% buyers | No impact |
For maximum long-term value and reliability, a traditional soil pipe is always preferable if architecturally feasible. However, in constrained London properties, a macerator can be the only practical way to achieve the goal of adding an en-suite, unlocking significant functional value.
Overheating Risks: Why You Need External Blinds on South-Facing Dormers?
A new loft room filled with light is a wonderful asset, but a south-facing dormer with large windows can quickly turn into an uninhabitable greenhouse during the summer months. This is due to solar gain, where the sun’s energy passes through the glass and heats the interior. Standard internal blinds or curtains do little to solve this, as they only block the light once the heat is already inside the room. This is a critical failure in creating valuable, year-round living space.
The most effective architectural solution is external shading. By stopping the sun’s rays before they even hit the glass, external blinds or shutters are dramatically more effective at preventing overheating. Technical studies demonstrate that external blinds can reduce solar heat gain by up to 75%, compared to only around 25% for internal blinds. This is a requirement that is increasingly being enforced by Building Regulations Part O, which specifically addresses overheating in new residential buildings.

Modern external blinds are sleek, motorised, and can be integrated seamlessly into the window design. They can be operated by remote control or even automated based on temperature and sun sensors. While they represent an additional upfront cost, they are a fundamental component of creating a comfortable and energy-efficient living environment. The alternative is relying on expensive and carbon-intensive air conditioning, or simply accepting that your new master bedroom will be unusable for several weeks a year.
Investing in effective solar control is not a luxury; it’s a core component of future-proofing your home and ensuring the space you create is comfortable and truly habitable, thereby securing its long-term value.
A room’s value is directly tied to its comfort. An overheated space is a design failure, regardless of its size or the view it offers.
Mill Conversions: The Challenges of Turning Factories into Art Spaces?
While converting an industrial mill into an art gallery may seem worlds away from a family home extension, the underlying principles of adaptive reuse offer powerful lessons. These large-scale projects magnify the challenges that can be encountered in any complex renovation, teaching us to look beyond the visible structure and consider the building’s history, legal status, and hidden liabilities.
Industrial conversions often grapple with issues like contaminated land from previous uses, the need for a formal “Change of Use” planning application, and complex negotiations with local authorities over community contributions (known as Section 106 agreements). These are extreme versions of the hurdles residential projects can face. For example, a simple change of use application for an industrial site provides a blueprint for understanding how planners assess the impact of a development on local infrastructure and character—a mindset that’s equally relevant when they assess a large L-shaped dormer on a quiet residential street.
Case Study: Bermondsey Tannery to Art Gallery Conversion
The conversion of a former leather tannery in Bermondsey offers a stark lesson in hidden costs. The project first required extensive contaminated land remediation costing £250,000 before any building work could even begin. Furthermore, to secure planning permission for the “Change of Use,” the developers had to navigate complex Section 106 agreements, ultimately providing 15% of the space as affordable artist studios alongside the main commercial gallery.
This highlights a universal truth: the success of a conversion depends on thorough due diligence. For a homeowner, this translates to commissioning a proper structural survey, understanding local planning precedent, and investigating the history of your own property before committing to a design. What you don’t know can significantly delay your project and inflate your budget.
The key takeaway for any London homeowner is to approach your extension with the same rigour as a commercial developer. Investigate, anticipate, and plan for the unknown. This architectural foresight is what separates a smooth, value-adding project from a costly and stressful ordeal.
Calculating the Real Cost of Rewiring a 3-Bedroom Victorian House in 2024
When planning a major extension like a loft conversion, it’s easy to focus on the cost of the visible new structure. However, one of the most significant “hidden” costs is often the need to upgrade the home’s existing infrastructure, particularly the electrics. The wiring in a Victorian house is often decades old, insufficient for modern demands, and may not meet current safety standards. Adding a new floor with bedrooms, an en-suite, and modern lighting will place significant new loads on this system.
A full rewire is often not just advisable but a requirement from Building Control to sign off on the project. This is an invasive process that involves chasing new channels into walls, lifting floorboards, and ultimately, re-plastering and redecorating most rooms in the house. This “making good” is a substantial cost that is frequently underestimated. In a typical project, additional plastering and making good costs typically add £2,500-£4,000 to the electrician’s bill.
The cost of the rewire itself is also highly variable and heavily influenced by your location within London. Day rates for qualified electricians differ significantly between inner and outer boroughs, which has a major impact on the total project cost. Budgeting accurately for this is essential to understanding the true financial scope of your renovation.
This table illustrates how the cost of a full rewire can fluctuate across different London zones, based on typical 2024 day rates.
| Zone | Borough Examples | Day Rate | 3-Bed Rewire Total |
|---|---|---|---|
| Zone 1-2 | Westminster, Camden | £350-£450 | £8,000-£12,000 |
| Zone 3-4 | Wandsworth, Barnet | £280-£350 | £6,500-£9,000 |
| Zone 5-6 | Havering, Croydon | £250-£300 | £5,500-£7,500 |
The value of a new loft conversion is directly supported by the quality of the infrastructure beneath it. Building a beautiful new space on top of an outdated and unsafe electrical system is a false economy that compromises both safety and long-term value.
Key Takeaways
- Architectural Value vs. Size: The best loft conversion is an integrated solution that solves your family’s needs, not just the one with the largest floor area.
- True Cost Includes Infrastructure: The total project budget must account for “hidden” essentials like fire safety upgrades, party wall fees, and electrical rewiring.
- Comfort Equals Value: A space is only valuable if it’s usable year-round. Factors like overheating must be addressed at the design stage with solutions like external shading.
Do You Need Planning Permission for a Garden Office with a Toilet?
The rise of home working has made garden offices incredibly popular, often built under Permitted Development (PD) rights, which allow for certain outbuildings without a full planning application. However, the moment you decide to add a toilet, the planning situation becomes significantly more complex. This issue offers a crucial lesson in how planners define the “use” of a space, a principle that applies to any part of your property.
Planning law makes a key distinction between uses that are “incidental” to the enjoyment of the main house (like a simple shed or basic office) and those that are “ancillary” (providing independent living facilities). Adding a toilet or kitchenette is often seen as crossing the line from incidental to ancillary, effectively creating a self-contained unit of accommodation. This nearly always requires a full planning application, as it is no longer considered a simple garden room.
This distinction is the core of many planning decisions and is a vital concept for any homeowner to understand. As the official guidance clarifies, the functionality you add dictates the legal status of the space.
The distinction between ‘incidental’ and ‘ancillary’ use is crucial. Adding facilities like toilets and kitchenettes typically shifts the use from incidental to ancillary, requiring planning permission.
– Planning Portal UK, Permitted Development Rights Guidance 2024
Furthermore, even if you avoid a planning application, adding a toilet will always trigger the need for Building Regulations approval to cover drainage (Part H), electrical safety (Part P), and ventilation (Part F). You will also need to make a formal application to your local water authority, like Thames Water, for a new sewer connection, which is a separate and often costly process.
The lesson here is clear: the value and legality of any space you create—be it in the loft or at the end of the garden—is determined by its intended use and its integration with services, not just its physical form. To navigate these complexities and maximise the potential of your property, engaging an architect early in the process is the most valuable first step you can take.
Frequently Asked Questions on Loft Conversions and Extensions
What ventilation is required for a loft bathroom under Part F?
Mechanical extract ventilation providing a minimum of 15 litres/second intermittent or 6 litres/second continuous extraction is required to comply with Building Regulations Part F. This is essential to control moisture and prevent damp or mould issues in the new space.
Can I install a macerator without Building Control approval?
No, all drainage alterations require Building Regulations approval under Part H, including macerator installations. A Building Control officer will need to inspect the installation to ensure it is safe, sanitary, and correctly connected.
What electrical safety requirements apply to bathroom macerators?
The unit must be connected via a fused spur located outside of the bathroom’s designated electrical zones (Zones 0, 1, and 2). The installation must comply with Part P of the Building Regulations and be carried out by a qualified electrician who can provide the necessary certification.
What’s the maximum size for a garden office without planning permission?
Under Permitted Development rights, outbuildings must not cover more than 50% of the total garden area. They must have a maximum height of 2.5 metres if they are within 2 metres of a boundary, or up to 4 metres with a dual-pitched roof if further away. These rights do not apply in all locations (e.g., flats, listed buildings) and can be removed by the local authority.
Does adding a toilet to a garden office always require planning permission?
Not automatically, but it is a major trigger. It requires Building Regulations approval for drainage (Part H) and often shifts the legal ‘use’ of the building from ‘incidental’ (like storage) to ‘ancillary’ (providing accommodation). This change in use generally requires a full planning application.
What are Thames Water connection costs?
The administrative cost for a new sewer connection application to Thames Water is typically between £350 and £500. This does not include the physical work. The cost for a contractor to install the connection pipework can range from £2,000 to £5,000, depending on the distance from the outbuilding to the main sewer and the complexity of the groundworks.